Assembling the FIR Sauna
Click here to learn more and to order your very own Relax FIR Sauna
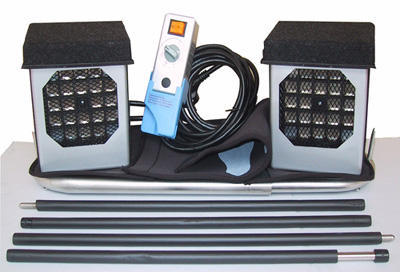
Open the Box. Take out the Chair. Take out the Sauna cover. Take out the box, which contains the Double Radiator.
The sticks also need to be taken out of the Sauna box. They are usually taped to the Radiator box.
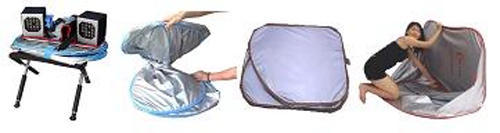
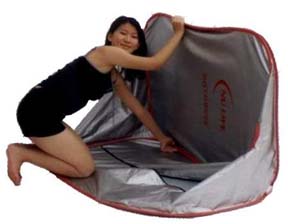
The process of setting up the Sauna tent is a very simple process.
Open up the Tent. You can see above 4 phases of opening up the tent. The next phase is setting the tent upright.
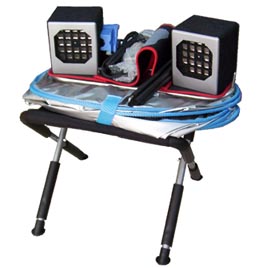
Insert the chair inside the tent. Then insert the Radiator unit inside the tent, with the radiators facing the chair.
Now pull the cord underneith the zipper, so it can be plugged in to an outlet.
Then use the zipper of the tent (with the cord underneath the zipper), and zip up the tent, as you would a jacket.
.
We have to now put the sticks inside the tent to hold the tent upright. These sticks attach to the radiator.
Put each of the two equal shaped double-ended sticks on each side of the radiator on top of the prongs.
Then put the “solid black stick” on top of the 1st stick to the left of the left radiator, as you face the sauna.
Now, place the stick with the metal open end with the black tip, to the right of the right radiator.
One more step remains.
The hardest part of setting up the sauna is getting the controller box on top of the stick that also holds up the sauna.
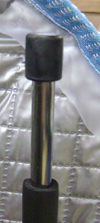
In 2010, the “shaved” pole pictured below was eliminated.
One Radio Network listeners are eligible for a special discount. Email Patrick for details
|
In 2010, the “shaved” pole pictured below was eliminated.
Both poles are now SOLID. And the SOLID POLE works just as well as the other pole shown below.
|
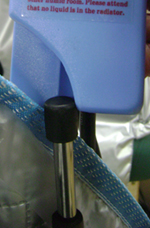
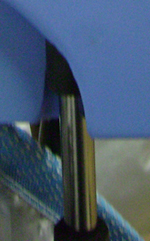
The blue controller box holder goes on top of stick, where the stick is tucked inside the tent as in the 4th picture above.
To get a feel for how to do this, you can put the controller box on top of the stick before inserting the stick inside the tent.
It wiggles. But when the stick is inside the tent, you can guide the groove in the blue controller holder over the stick.
It then fits snugly, as in picture 4, and not loosely, as it is in picture 3. The stripped stick & the controller box
go on the right side of the sauna tent, as you face the tent. This is pretty much the hardest part about putting the sauna together.
Now Plug the 3-prong (or 2 prong if older model) plug into any regular 110 outlet. You are almost ready to sweat now !
Put a folded towel on top of the seat. Now drape a towel over the whole seat. Turn the dial to 15, 20 or 30 minutes.
Flip the Switches (1 switch if an older model), the orange light will turn on, the far infrared light is now being
generated, and you can hear the fan pushing the heat away from the semi conductor chip so that the chip continues
to work. Remember it is the healing light (that you can’t see) that is being absorbed into the body.
The heat you feel initially inside the tent is a by-product of creating this healing light, which your body absorbs
and resonates with. The light interacts with the water molecules inside your body, and magic starts to happen.
Good luck enjoying your Relax Sauna. Rest assured, you have purchased the highest quality and most effective
Far Infrared Sauna in the world today. If you get too hot, turn one of the radiators off. You will continue to absorb the
healing light throughout the tent. You can also unzip the zipper 6-10 inches, and still experience its benefits.
Travel Friendly !
The Sauna and chair together, boxed as it is shipped to you, only weighs 32 lbs. As you can see in the pictures above,
the Sauna folds very nicely and is very easy to travel with. It uses about an 8 foot foot cord to plug in, and no matter
where you are, you are all set to start your sauna. (hotel, friend’s house, on patio, etc.)
The Radiator and Tent will both fit in a traveling case that comes with your sauna. This weighs about 15 lbs.
The insulated chair that comes with the Sauna weighs about 12 lbs. The box itself weighs about 4 lbs.
The Heating Ceramic Semiconductor unit’s energy circulates throughout the Relax Sauna by
a special reflecting (shiny) material of the inside surface of the Sauna tent of the Relax Sauna,
thus REFLECTING the Far Infra Red Rays throughout the whole Sauna.
 |
Â
|
|
Set up takes about 2-3 minutes.
|
Unwrapping.
|
 |
 |
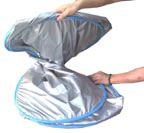
UNFOLDING AND STORING
Your SAUNA
|
Leave your Sauna intact all the time…
|
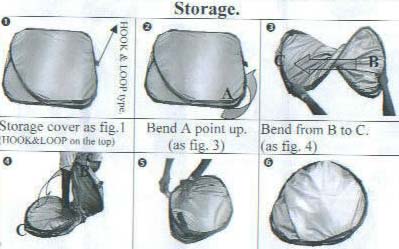 |
| …or fold up into a compact space for storage or traveling. |

'Assembling the Sauna' has no comments
Be the first to comment this post!